Thursday, December 4, 2025

Excel VBA Code to Excel to Word

 This below code will help to Excel data to word file:

Sub GenerateWordFiles()


    'Declare Word application and document objects

    Dim wdApp As Object              'Word application instance

    Dim wdDoc As Object              'Word document instance


    'Paths for template, output folder, and 2nd workbook

    Dim TemplatePath As String

    Dim SavePath As String

    Dim Macro2Path As String


    'Excel variables

    Dim lastRow As Long, i As Long

    Dim contract_keys As String, contract_name As String


    'Word Table variables

    Dim tbl1 As Object, tbl2 As Object

    Dim wb2 As Workbook

    Dim wsCP As Worksheet            'Connected Parties sheet

    Dim CP_LastRow As Long          'Last row of CP output

    Dim CP_Row As Long              'Loop counter

    Dim tbl1_Row As Long, tbl2_Row As Long


    'Read paths from RUNNNN sheet

    ''Change below ThisWorkbook.Sheets("RUNNNN") with your Workbook1 sheet name

    '''Change H2,J3,J4 to your path addresses

    Set wb1 = ThisWorkbook.Sheets("RUNNNN")

    TemplatePath = wb1.Range("J4").Value     'Word template

    SavePath = wb1.Range("J3").Value         'Output folder

    Macro2Path = wb1.Range("J2").Value       '2nd workbook file path

    startNum = wb1.Range("J1").Value


    'Create output folder if not exists

    If Dir(SavePath, vbDirectory) = "" Then MkDir SavePath


    'Get last row in column A

    lastRow = Cells(Rows.Count, "A").End(xlUp).Row


    'Create Word application

    Set wdApp = CreateObject("Word.Application")

    wdApp.Visible = True                                'Show Word


    'Open the second workbook containing the macro

    Set wb2 = Workbooks.Open(Macro2Path)


    'Loop through input rows starting from value in RUNNNN J1

    For i = startNum To lastRow


        'Read contract values

        contract_keys = wb1.Cells(i, "A").Value

        contract_name = wb1.Cells(i, "B").Value


        'Send contract key into wb2

        ''Change sheet name where it want to place the contract_keys, mention that sheet name

        ''If you want to place it in multiple places, copy the same below line code extra and

        ''change the sheet name and range below.

        wb2.Sheets("Sheet1").Range("D2").Value = contract_keys


        'Run macro in second workbook

        Application.Run "'" & wb2.Name & "'!PopulateAndSortCPsDetails"


        'Set reference to CP output sheet after macro runs

        ''If the output needs to pull from different sheet then change the name below

        ''If the output wants to pull from multiple sheet replace the same line

        ''again below with different Set Variable

        Set wsCP = wb2.Sheets("Connected Parties Check")


        'Open the Word template for this contract

        Set wdDoc = wdApp.Documents.Open(TemplatePath)


        'Replace the tag with contract name

        ReplaceTag wdDoc, "<<Contract_Name>>", contract_name


        '------------------ TABLE PROCESSING BEGINS ----------------------------


        'Get references to Table 1 and Table 2

        Set tbl1 = wdDoc.Tables(1)

        Set tbl2 = wdDoc.Tables(2)


        'Find last row of data from A11 downward

        CP_LastRow = wsCP.Cells(wsCP.Rows.Count, "A").End(xlUp).Row


        '-----------------------------------------------------

        ' TABLE 1 ? Insert/Delete rows based on CP output

        '-----------------------------------------------------


        'Ensure table has correct number of rows

        AdjustWordTableRows tbl1, CP_LastRow - 10   'Subtract 10 because data starts at row 11


        'Fill Table 1 rows

        tbl1_Row = 2   'Assuming row 1 is header


        For CP_Row = 11 To CP_LastRow

            tbl1.Cell(tbl1_Row, 1).Range.Text = wsCP.Cells(CP_Row, "F").Value

            tbl1_Row = tbl1_Row + 1

        Next CP_Row


        '-----------------------------------------------------

        ' TABLE 2 ? Only authorised rows (Column M)

        '-----------------------------------------------------


        'Clear all existing data rows in Table 2 (except header)

        AdjustWordTableRows tbl2, 0


        tbl2_Row = 2


        For CP_Row = 11 To CP_LastRow


            If wsCP.Cells(CP_Row, "M").Value = "Authorised" Then


                'Add new row in Table 2

                tbl2.Rows.Add


                'Write Column L value into Table 2

                tbl2.Cell(tbl2_Row, 1).Range.Text = wsCP.Cells(CP_Row, "L").Value


                tbl2_Row = tbl2_Row + 1

            End If


        Next CP_Row


        '------------------ TABLE PROCESSING ENDS ----------------------------


        'Construct file name

        ''Here contract_name will be your output extra sub folder will create

        Dim FileName As String

        FileName = SavePath & "\" & contract_name


        'Create subfolder if missing

        If Dir(FileName, vbDirectory) = "" Then MkDir FileName


        'Final file path

        ''File name will pick first 2 characters

        FileName = FileName & "\CDD_" & Left(contract_name, 2) & ".docx"


        'Delete existing file if already exists

        If Dir(FileName) <> "" Then Kill FileName


        'Save Word file

        wdDoc.SaveAs2 FileName


        'Close Word file

        wdDoc.Close False


    Next i


    'Quit Word application

    wdApp.Quit


    MsgBox "All Word files generated successfully!", vbInformation


End Sub


Sub ReplaceTag(doc As Object, findText As String, replaceText As String)

    With doc.Content.Find

        .Text = findText

        .Replacement.Text = replaceText

        .Forward = True

        .Wrap = 1

        .Execute Replace:=2

    End With

End Sub


Sub AdjustWordTableRows(tbl As Object, requiredRows As Long)


    Dim currentRows As Long

    currentRows = tbl.Rows.Count - 1          'Minus header


    'Add missing rows

    While currentRows < requiredRows

        tbl.Rows.Add

        currentRows = currentRows + 1

    Wend


    'Remove extra rows

    While currentRows > requiredRows And requiredRows >= 0

        tbl.Rows(tbl.Rows.Count).Delete

        currentRows = currentRows - 1

    Wend


End Sub


Sub CleanWordTableEmptyRows(tbl As Object)

    Dim r As Long


    For r = tbl.Rows.Count To 2 Step -1        'Skip header row

        If Trim(tbl.Cell(r, 1).Range.Text) = "" Or _

           Trim(Replace(tbl.Cell(r, 1).Range.Text, Chr(13), "")) = "" Then

            tbl.Rows(r).Delete

        End If

    Next r


End Sub


Saturday, May 28, 2011

Install Windows xp Very Fast


Now, this tip will be very helpful for those who frequently install windows xp operating system. Normally OS installation takes around 40 minutes to complete, but through this trick you can now save 10-15 minutes. This simple tricks goes this way.

1. Boot through Windows XP CD.


2. After all the files are completely loaded, you get the option to select the partition. Select “c”.

3. Now Format the partition, whether it is normal or quick with NTFS or FAT

4. Once the formatting is completed, All the setup files required for installation are copied. Restart your system by pressing Enter.

Now, here begins the Simple trick to save 10-15 minutes.

5. After rebooting, you get a screen where it takes 40 minutes to complete or finalize the OS installation.

6. Now, Press SHIFT + F10 Key -> This opens command prompt.

7. Enter “Taskmgr” at the command prompt window. This will open Task Manager.

8. Click the Process Tab, here we find a process called Setup.exe -> Right Click on Setup.exe -> Set Priority -> Select High or Above Normal. Initially it will be Normal.

Thats it, no more work to do. Relax your self and see how fast the installation process completes

Play Angry Birds Offline on your Browser! [Chrome]

Anyone familiar with iPhone apps, would have heard of the app called Angry Bird. The puzzle like video game, which has wingless birds being used to destroy green coloured pigs has been a massive hit over the last year. The combination of humour, puzzles and simplicity has created one of the biggest gaming hits in the past couple of years.


It has been downloaded about 140 million times across platforms. It was initially released on Apple’s iOS platform. Now there are versions for Symbian, Android, Mac OS X, Windows and PlayStation.

With Chrome web store, users can play Angry Birds on a browser.

Installing Angry Birds on Chrome!
•The Angry Birds Chrome app can work with any browser, but if used on Chrome, we can use some of the Chrome specific features.
•One of them is Chrome Bombs and other special features.
•Also if using as Chrome web app, we can play the game on the browser even when the computer is offline. This could be very useful for frequent travellers who spend a lot of time killing time on trains and aeroplanes where you may not be able to access the internet.
If you are new to the Angry Bird phenomenon, look up the video below which gives a back story.

Monday, January 24, 2011

How to Create a Hard Disk Partition in Windows 7

Do you have plenty of free space on your C: drive? If so, one of best things you can do is to create another drive on your hard disk by creating a new partition (also known as a volume). Fortunately, Windows Vista and Windows 7 both allow you to do this easily.You might be wondering why this is such a good idea. The safest place to store important information would be on a different machine, a backup drive or DVD. These aren’t always immediately available. It’s convenient to have an extra drive always there when needed. Another reason is that your operating system may some day need to be re-installed. If your personal information is on the same drive as the OS, you might lose it if it’s not backed up somewhere else.
Now that I’ve told you why, I’ll show you how. First, we’ll open the disk management console. An easy way to do this is the hit the Start button and type in the word “partition”, then select the result labeled “Create and format hard disk partitions”.
search-menu
Right click on the C: drive and choose “Shrink Volume”. This is the first step in creating the space you need for your new partition.
shrink-volume
Now you’ll see the system checking to see how much space you can borrow from your C: drive.
querying-shrink-space
After the query process, you’ll see the size before and size available. Type in the number of megabytes you want for your new partition. Keep in mind that 1024 megabytes is equal to one gigabyte. Also make the size smaller than the “available” by a one or two thousand megabytes, just to allow a safety margin.
amount-of-space-to-shrink
After the Shrink process finishes, you’ll see the new partition as “Unallocated”. The next step is to turn it into a simple volume. Right click on the unallocated space and chose “New Simple Volume”.
new-simple-volume0
Now you’ll see the “New Simple Volume Wizard”.
simple-volume-wizard
After clicking “Next”, you’ll be asked to specify a size for the new volume. The default is what you’d normally want, so click “Next” once again.
simple-volume-wizard2
You’ll be prompted to assign a new drive letter. I usually choose a higher letter so that the DVD or other devices on your system won’t have to be assigned new letters when they are detected. Click “Next” when you are done.
simple-volume-wizard3
Now you’ll be asked if you want to format the new volume. The best choice is typically NTFS. After making your choice here, click “Next”.
simple-volume-wizard4
You’ll be given one more look at the settings before you launch the formatting process. Review the info and click “Finish” when ready.
simple-volume-wizard5
Before it starts, you may get a warning about “Dynamic disk’s”. If you aren’t dual booting another operating system, you can ignore this and click “Yes”. If you are using more than one OS, you might lose any special boot managers at this point. You should research your best options if that’s the case.
dynamic-disk
Your new disk will appear in the Disk Management console now.
new-simple-volume2
That’s all there is to it. When you return to Windows, you’ll be able to use the new disk to store your personal information.

Remove AUTORUN.INF from infected computers

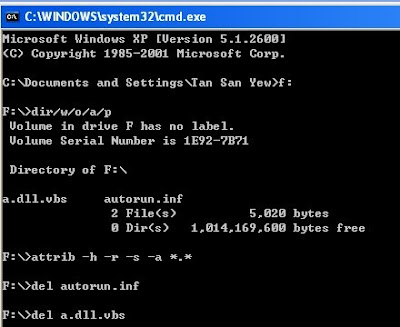
Remove Autorun.inf Manually here i have given  3 methods .Choose anyone Method to remove the Virus…
1st Method :
Start–>Run–> Type Cmd –>Click Ok
so just type this stuff
at c:\ prompt
attrib a*.inf -h -a -s -r
del autorun.inf

Note : Then Change the Drive Letter C,D,E,F,G….and repaeat the Same Process..
Example :
delete Remove AUTORUN.INF from infected computers
2nd Method:
This Method is Simple and Easy,

Here is a simple code to remove autorun.inf: (start copying from the next line down):
cd\
c:
attrib -r -s -h autorun.inf
del autorun.inf
d:
attrib -r -s -h autorun.inf
del autorun.inf
e:
attrib -r -s -h autorun.inf
del autorun.inf
f:
attrib -r -s -h autorun.inf
del autorun.inf
g:
attrib -r -s -h autorun.inf
del autorun.inf
h:
attrib -r -s -h autorun.inf
del autorun.inf
i:
attrib -r -s -h autorun.inf
del autorun.inf
j:
attrib -r -s -h autorun.inf
del autorun.inf
k:
attrib -r -s -h autorun.inf
del autorun.inf
l:
attrib -r -s -h autorun.inf
del autorun.inf
m:
attrib -r -s -h autorun.inf
del autorun.inf
n:
attrib -r -s -h autorun.inf
del autorun.inf
o:
attrib -r -s -h autorun.inf
del autorun.inf
p:
attrib -r -s -h autorun.inf
del autorun.inf
q:
attrib -r -s -h autorun.inf
del autorun.inf
r:
attrib -r -s -h autorun.inf
del autorun.inf
s:
attrib -r -s -h autorun.inf
del autorun.inf
Copy this in a NOTEPAD file, then save the notepad file as : “file.bat” and then run it to remove all the rubbish of autorun.inf
3rd Method :
Autorun Eater:
Autorun Eater was born due to increase of malwares using the ‘autorun.inf’ tactic to infect users unknowingly be it from flash drives, removable hard disks or any other removable storage device.

Download: Autorun Eater

Saturday, January 22, 2011

Convert Text on Webpages into Speech, Voice: (Don’t Read, Listen)

SpeechUtil is a Firefox add-on that allows you to listen the english text, selected in the web-page. Add-on converts selected text into the speech in OGG format.
# Install SpeechUtil : Link
Step 1 : After installing restart browser.
Step 2 : Simply select some text on any webpage.
Step 3 : Right Click and select "Listen Selected Text" menu-item in the context pop-up menu.
Listen to Selected Text on WebPages
You can click the yellow speaker icon in the right-bottom corner of the browser window.
Step 4 : Speech window will appear on the screen and you will be able listen to text, you just selected.
Convert Text on Webpages into Speech, Voice
This an useful way to listen to news online or just convert any article into speech and listen to it instead of reading it.
Note: You can actually download the .ogg file (audio of selected text) if you have the video download helper (add-on) installed.

Wednesday, December 29, 2010

Copy USB Drive contents to PC automatically without action Silently

Instead of running each time copying files Function from the device USB your hard disk, you can automate copying all the contents of the pen drive on the hard drive of your PC without any user action.
This is useful many a times when you want to steal data content from your friend who doesn’t want to share or allow you to copy.
AutoUSBCheck is a small software designed to facilitate the use of these devices for mass storage.
By default, the software does not start automatically at boot, but you can make this happen simply by setting the option.
Once you launch the software from the Windows Start menu, select the option Run on Windows startup.
Copy USB Drive PC silent

The free version allows you yo copy silently all the contents running in background while the paid version allows to change the directory where the content will be copied.
This freeware can run completely invisible. No icons, no progress bars, no prompts, it just does the job.
Download AutoUSBCheck

Wednesday, December 15, 2010

Extract Messages Phonebook Contacts And More From Nokia Backup File

All the Nokia mobile users use either one of the two mostly used applications – PC suite or OVI suite for accessing the contents of their mobiles from their computer. These two applications allows users to manage their folders and data in their phone easily. They not only allows them to download new contents for phones, convert music, download maps but also provide an option of backup functionality which is very useful.
With the feature of backup functionality, you can make a backup of all the contents and settings of your phone easily which can be restored later anytime required.

When you will run the application, its main window will appear like this. The tool is very easy to use. You just have to open the backup file of .nbu extension using the shortcut ‘Ctrl+O’ or ‘open’ option in the file menu. You can also drag the file directly and drop it on the application window for opening it.
image
Now, your backup will be opened with the folders name at the left side of main window and the contents of the folders on the right side. You can very easily manage and access the stored data.

image
The tool also provides the option of exporting a particular file, folder or all the data to your computer so that you can use it in worst case of failure of your backup files. These options are present in the file menu.
The application also keeps a log of the files which can be opened in the ‘file parsing log’ tab. Here, it will show you some of the detail of the phone as well. The entire log can be saved on the computer using the option of ‘save parsing log’ in the file menu.
image
In short, it is a nice tool which is a must have for Nokia phone users who want to read and access their backups on the computer.
Download NBU Explorer

Download Multiple Free Files From Rapidshare

Rapidshare allows to download only a single file at a time with free account. If you want to download multiple files at the same time, you need to buy a premium account but now you can download multiple files from Rapidshare free account without paying anything with RapidShare Download Accelerator.

With RapidShare Download Accelerator, you can add all the files you'd like to download, and it will do all the annoying work for you. Now you can just sit back and watch your files download without paying a dime.

Links : Download Rapidshare Download Accelerator

Run, Play Mobile Games on PC with KEmulator

The tool is KEmulator Lite I am going to pick. It’s a JVM for creating a Java runtime environment in your PC. Like mobile you don’t have to install the game in your PC. Just install KEmulator and browse the game from hard drive. It doesn’t acquire huge memory spaces like the computer games.
# Download KEmulator (Click Here)
Well, now come to point-first download KEmulator and install it. Now look it’s a RAR file, extract and click on the KEmulator.exe to start the installation. When done, run the application from Start Menu. 
Now you’re on the main window, click on "Midlet > Load jar…" and browse the game from your hard drive. The game will start to run in few seconds.
Play Mobile Games On Computer: Run Mobile Games, Apps On PC
It also offers you some extra features like restarting the game, rotating the screen horizontally or vertically as per game’s requirement etc. You can make a visit to Gameloft to get more collections of awesome, stunning mobile games. Note: You can’t run any other kind of game files such as .sys etc.

Find and Fix Broken Shortcuts

Whenever we install some tool in our system, we can choose either to create a shortcut on the desktop or not, but in most of the cases a shortcut is created. A shortcut is a nice way to start a program without going actually to its location.
With period of time, it happens that we either delete the program or change its location, in that case the shortcut is not updated which leads to nothing on double clicking it. So if your system also has several broken shortcuts which lead to nothing then here is a tool called Broken Shortcut Fixer that can search for all the invalid shortcuts for you and attempt to repair them automatically.
What this tool does is, it scans for all the broken and invalid shortcuts in the system and automatically tries to repair it but in case it is not able to repair the shortcut then it lists all those shortcuts before you to take the necessary action. You can now either delete the shortcut or manually browse for the file.
The tool Broken Shortcut Fixer is supported on both 32 and 64 bit versions of the Windows OS and the tool can be downloaded from the location below.
Download Broken Shortcut Fixer

Thursday, December 9, 2010

Open, View Any File Type On Any Windows Computer

Have you run into trouble when you download some file from the Internet and not able to open it? Mostly it happens when you don’t have a software required to view that file. For example, you download a presentation in ppt format on your computer and don’t have Microsoft Office or Open Office installed on your computer, then you won’t be able to open it. The problem becomes more when you are using somebody else’s computer, when you don’t know which software is installed on that computer !
windows file icon
In this post, I will share a wonderful portable tool which you can copy on your pen drive and take it anywhere. It will run on any Windows computer and will open almost all kind of common file types which people usually download from Internet or some other computers.

The tools is well named as – Universal Viewer. Its is a very light weight tool, comes in Windows installer as well as the portable version. The portable version is under 6 MB of download and when you extract it it will take around 12 MB space on your disk. You can carry the portable version with you on a pen drive and run this tool to open any type of file on any windows computer anywhere.
universal-viewer

This viewer supports following type of files to be opened without installing any other software :
  • Text, Binary, Hex, Unicode: any files, of unlimited size (even 4Gb+ sizes are allowed)
  • RTF, UTF-8: RTF and UTF-8 encoded texts
  • Image: all general graphics formats: BMP JPG GIF PNG TGA TIFF… plus all formats supported by IrfanView/XnView external viewers
  • Multimedia: all formats supported by MS Windows Media Player: AVI MPG WMV MP3…
  • Internet: all formats supported by MS Internet Explorer: HTML PDF XML MHT…
  • Plugins: all formats supported by Total Commander Lister plugins
  • MS Office: all file types of MS Office (if installed): DOC DOCX XLS PPT…
  • Converters: some types can be viewed as plain text: DOC DOCX PDF PPT ODT…
We recommend that you keep this tool handy with you on your pen drive, you never know when it will save you from a lot of hassle.
Download Universal Viewer Portable | Universal Viewer Installer

Tuesday, October 19, 2010

5 Excellent Free Websites to Make Animated GIFs

All of us love to have animated GIF images as your display pictures on our Instant Messengers, social network profiles and what not. However, very few can actually create their own GIF images according to their own liking. Today we present to you five of the easiest online tools which you can use to create your own GIF images and then use them wherever you like:

Imator

Probably the easiest tool to get hold of in order to make animated GIF images, Imator just does that and more. The great thing is that there seems to be no limit to how many images you can upload and convert them to GIFs. Also, you can create animated banners and avatars for use on blogging websites and forums to let everyone see your creativity. Images can be uploaded from your PC and/or any URL. The simple drag and drop interface easily lets you work and animation speeds of your images can be selected from a pre-defined drop down list.

imator-1

imator-2

Loogix

Another great website which allows for creation of animated GIF images, Loogix helps you create your own animated GIF in just three steps. First you need to upload an image (PC or URL). Next, you are required to select the size and speed of the animation you want to apply and finally generate the desired animation and that’s it. Your GIF animated image is ready. Maximum pixel size which can be set is 400 pixels using Loogix.

loogix

Gickr

The great thing about Gickr is that it allows you to upload images from YouTube as well, making it easy for you to make animated images out of video clips. Simply Specify a YouTube video URL and you’re on the go. There is a limit of 10 pictures maximum for Gickr which might be a turn off for many. Also a YouTube video converted will only contain a maximum of 45 frames. However, the ability to make animated images from YouTube videos is just amazing. Created GIF Images are downloadable to PC as well.

glickr

Picasion

Picasion gives you the ability to resize your images before you actually turn them into animations and also lets you upload pictures from many services like Facebook, Twitter, Bebo, MySpace, Flickr etc. Moreover, you can also rotate the pictures and add color effects to them while turning them into cool animations.

picasion 5 Excellent Free Websites to Make Animated GIFs

Make A GIF

The best thing about Make a GIF is that you can add multiple images at the same time up to a maximum number of 12 with each image not being more than 1MB in size. Also, you can edit and resize the image before applying the animation and animation time can be set even in milliseconds for some more precision. However, one bad thing about Make a GIF is that it doesn’t provide the user with the ability to one-click download the created GIF and you have to manually save it from your browser.

makeagif

How to lock your CD-Rom

Below are the tricks to Lock your CD ROM;

Go To;

Run;

Type; regedit

Find; allocatecdrom.

Change the Value from 1 to 0.

Done.

Now it is locked

then to Unlock Change It 0 To 1.

Play, Watch Youtube Videos in VLC by Network Streaming

The latest version of VLC supports network streaming which means you can download youtube directly into VLC media player and watch it or record it. Sometimes this also helps if youtube is blocked in your network but you have the link to the video.

Stream Play Youtube Videos in VLC

  1. Open VLC Media Player (download vlc).
  2. Go to Media > Open Network Stream.
  3. Paste the Link of any online video, For eg: I am using Chris Brown – Forever
  4. Click on the Play button.

Now you can watch the video inside VLC itself

Here is a video guide to the process I found on youtube.

Advantage : Record Youtube Videos in VLC by Network Stream

There is only one advantage of this method and ie, to download or save the streaming video in any format of our choice.

1. In the Open Network Stream page Click on the down arrow of the Play Button.

2. Select Convert. (see pic. right)

3. Add your desired Settings in the window as below.

After the streaming is complete you will get the full video saved in format you set.

This way, you don’t have to use any online youtube downloader, or install any app. to convert youtube videos to your required output. Enjoy !

Best Command Prompt Tricks & Hacks for Windows


Best Command Prompt Tricks & Hacks for Windows This is an excellent post which can really make your life easier in the *NIX world. But, for many, it is a Windows kind of life. So, for those of you out there, I have put together some Windows command line tricks that might make your life easier.


15 Popular Command Prompt Tricks & Hacks

Save A List of Files to a Text File by Extension

dir *.ext /s /b > files.txt

This command line will create a file called files.txt. When you open this file, there will be a complete list of all the files in that directory and all subdirectories with the .ext extension. You can then open up this text file in any text editor and work this the information.By changing the ext part, you can select different files. For example, if you wanted to list all of the PDF documents, you would type:

dir *.pdf /s /b > files.txt

Get Your IP Address Information

ipconfig /all

This will retrieve a pile of information about your network connection and IP information. From this command, you can get:

  • Host Name
  • Primary DNS Suffix
  • Node Type
  • IP Routing Enabled
  • WINS Proxy Enabled
  • DNS Suffix Search List
  • Connection-specific DNS Suffix
  • Network Adapter Description
  • Physical (MAC) Address
  • DHCP Enabled
  • IP Address
  • Subnet Mask
  • Default Gateway
  • DNS Servers

Get Installed Driver Information

driverquery

It can be very useful when troubleshooting to know what drivers are installed on a system. This command will give you a complete listing of the drivers and when they were installed.

Copy Files Via Infrared Port

irftp filename.ext

This will fire up the Wireless Link dialog so that you can copy the specified file via an infrared port.

Find Files Opened By Network Users

openfiles /query

If you are running a system and you want to know who has files open on your computer, this command will provide you a list of those users and the files that they have open.

Note: If you get an error saying The system global flag ‘maintain objects list’ needs to be enabled to see local opened files, you can fix this issue by typing openfiles /local on. You will have to reboot the system but it will resolve the issue.

Monitor Port Activity

netstat -a 30

This will show you all of the TCP/IP ports that are being used on your system and what they are connecting to (or being connected from). It will continue to monitor these ports and refresh the information every 30 seconds. You can change the refresh rate by changing the number at the end of the command.


Recover Information From A Corrupt File

recover filename.ext

If you have a disk with damaged sectors, you can attempt to recover as much information as possible from the damaged file. Data that is not damaged can be retrieved but data in damaged sectors will be lost.

Defragment Remote Computer

rexec remotePC defrag C: /F

This command used the rexec command to force a defragment of the C: drive on the computer named remotePC. You can use whatever you want to for the command (I just used defrag C: /F as an example). This is very useful for remote maintenance.

Retrieve Detailed System Information

systeminfo

With this command, you can retrieve the following information:

  • Host Name
  • OS Name
  • OS Version
  • OS Manufacturer
  • OS Configuration
  • OS Build Type
  • Registered Owner
  • Registered Organization
  • Product ID
  • Original Install Date
  • System Up Time
  • System Manufacturer
  • System Model
  • System type
  • Processor(s)
  • BIOS Version
  • Windows Directory
  • System Directory
  • Boot Device
  • System Locale
  • Input Locale
  • Time Zone
  • Total Physical Memory
  • Available Physical Memory
  • Virtual Memory Max Size
  • Virtual Memory Available
  • Virtual Memory In Use
  • Page File Location(s)
  • Domain
  • Logon Server
  • Hotfix(s)
  • NetWork Card(s)

Automatically Defragment C: Daily

schtasks /create /tn "Defrag C" /tr "defrag c: /f" /sc daily /st 23:00:00 /ru "System"

This will set your computer to automatically perform a complete defrag of the C: drive each day at 11:00:00 PM (23:00:00). It does this by creating a scheduled task called Defrag C. It will run this command under the computer’s system account.

Map A Drive Letter to a Folder

subst W: C:\windows

Sometimes, your directory structure can get pretty deep and complicated. You can simplify this a bit by mapping a drive letter to commonly used folders. In the example that I have given, this will create a drive letter W: and map it to the C:\windows directory. Then, whenever you go into My Computer, you will see a W: drive and when you browse to it, it will automatically take you to the contents of the C:\windows folder.

You can do this with any unused drive letter and any folder that exists on your system.

List All Tasks Running On The Computer

tasklist

It’s always good to know what is running on your system. This is the command line version of the processes tab in Taks Manager.

Kill A Program

taskkill /im programname.exe /f

If, when using the tasklist command, you discover that there is something running you just want killed. This is the way to do it! Just note the program name and use it in place of programname.exe.

Reboot a Remote Computer

shutdown -r -f -m \\remotePC -c "System will be rebooted in 20 seconds"

Sometimes, you just need to reboot a system. This will do it remotely and give the user a 20 second warning.

Tip : To open Command Prompt, click Start, click Run, type cmd, and then click OK.

How To Know Who Blocked You on Google Talk

GTalk 128x128 How To Know Who Blocked You on Google TalkIf you are curious to know that someone has blocked you on Gtalk then you can easily find the person who avoiding you and blocked you. Sometimes you noticed that your friends is not contacting you , even when you send messages to them they never reply back. It means either he/she avoiding you or blocked you in gtalk.Would you like to find out who are those people who have blocked you on GTalk?

Here’s an easy way to do that.This can be done using the chat client Pidgin. Pidgin allows you to chat across multiple networks simultaneously. It means that you can chat with your MSN, GTalk, Yahoo and other online buddies all at the same time from one single IM client.

Just follow the simple steps :

Step 1 : Download & Install Pidgin.

Step 2 : Configure Pidgin for Google Talk using the following steps :

a) Add Gtalk account to Pidgin, Go to Accounts > Manage > Add, this will bring a new window Add Accounts ;

1 How To Know Who Blocked You on Google Talk

b) Enter you gmail account details as shown in the following image, Keep Protocol as XMPP , Domain as gmail.com and Resource as HOME,

21 How To Know Who Blocked You on Google Talk

c) Now click on Advance Tab in the same window; and make the settings as shown in the following figure.

3 How To Know Who Blocked You on Google Talk

d) That’s it. You are done with Pidgin settings. Now lets find out who has blocked you on Gtalk.

Step 3 : Sign in to Pidgin with your Google Talk account, Go to Buddies > Show Offline Buddies.

4 How To Know Who Blocked You on Google Talk

Step 4 : If someone has blocked you on Gtalk , then they appear offline just like other offline contacts who are really offline.

Step 5 : Select the contact from the list and then Right click, click on Get Info.

Step 6: Once you click on Get Info then it will show the some info about the profile of the person. But if the person has blocked you on Google Talk, you won’t be able to see his/her full profile. You can’t even see his/her profile name.

6 272x300 How To Know Who Blocked You on Google Talk 5 276x300 How To Know Who Blocked You on Google Talk

So if you get the profile info like the left side image means this person has not blocked you. But if you get the blank screen like the right side image, it means this contact has blocked you and doesn’t wish to talk to you.


Download Pidgin | Gtalk

The Best Firefox Add-ons for E-Learning: 100 Firefox Add-ons For Students

Firefox Add-ons can now help you in everyday e-learning, no matter if you are a student or a parent who’s helping his/her children. Today we wanted to share with you a list of Firefox extensions that can help you out with your daily learning and studying sessions.

So here there’s a list of tools, from subject-specific tools to tools to help with research and productivity to tools that give parents control over the safety of the family computer, there are sure to be plenty of great options for you.

Here’s the list:

  • Math

    Download these add-ons to have access to everything from calculators to math encyclopedias.

    1. Open Mathematical Encyclopedia

      Find theorems, basic problems, and axioms listed in this great resource for students learning math.

    2. Wolfram MathWorld

      Search one of the biggest math resources available on the web with this tool.

    3. avzCalculator

      Use this tool as a calculator extension in Firefox.

    4. Simple Calc

      Here’s another calculator extension available for Firefox.

    5. Fire Cal

      This calculator suite provides specialized functions such as compound interest, temperature, wind chill, body mass index, and more.

    6. Graphing Calculator Toolbar

      Enter up to five equations with this tool and see results graphed.

    7. FireMath

      For upper-level students in math, physics, or engineering, this tool will help generate math equations.

    8. Converter

      Convert measurements, time zones, or temperatures with this tool.

    9. Forex Currency Converter

      Learn the current conversion for any currency in over 180 different exchange rates.


  • Science

    Help your children enhance their science lessons with these add-ons.

    1. Eccellio Science

      Use this tool when doing science research to get results from quality websites.

    2. Life Science Dictionary Tool

      Find definitions to 100,000 life science terms with this tool.

    3. i-cite

      This tool instantly recognizes results from sites such as PubMed and Google Scholar and creates a mash-up of available information.

    4. sequere.eu Science

      To broaden your student’s search for scientific research, use this tool to search by specific areas across Europe.

    5. Medical Terms Dictionary

      Perfect for students interested in pursuing a future in the medical field, this dictionary provides definitions to tons of medical terms.

    6. Labmeeting

      Locate journal articles available on PDF with this tool.

    7. hbar

      Search for physics information located at the arXiv repository.

    8. Weather Watcher Live

      This tool offers a great way to learn about the weather as it’s happening.


  • English Language Arts and Reference Materials

    Find everything from dictionaries to vocabulary builders to free online texts with these tools.

    1. Bibliomania search

      Search Bibliomania to find information from classic texts, biographies, reference material, and more.

    2. WordStash.com

      Described as part flash card and part dictionary, this add-on makes learning vocabulary fun.

    3. Shmoop

      Use this add-on to search for literature and US history study guides and teaching resources with Shmoop.com.

    4. Project Gutenberg

      Search by book title to get access to a completely free online version of over 30,000 books.

    5. Research Word

      When students use this tool, they can research any word that occurs on a webpage with results coming via Wikipedia, dictionaries, and other sites.

    6. Dictionary Lookup Extension

      Highlight a word and find its definition immediately.

    7. Thesaurus

      Quickly find a synonym for any word with this add-on.

    8. United States English Dictionary

      This tool is a spellchecker based on American English.

    9. Merriam-Webster

      Use this add-on to have access to the Merriam-Webster dictionary right on your computer.

    10. Dictionary.com

      Have access to yet another popular dictionary with this tool that also includes a thesaurus, spellcheck, and translate function.

    11. WordIQ Toolbar

      Search for the meaning of a word among many dictionaries and other resources. There is even a family filter on this.

    12. Wikipedia

      Enhance your Wikipedia searches with this tool.

    13. SnappyWords Visual Dictionary

      Find definitions and synonyms with the visual display available with this dictionary.

    14. Lexiology.com Dictionary

      Get more than just definitions with this dictionary that includes audio, phonetics, and usage information.

    15. Encyclopedia

      Use this tool to search Wikipedia, Encyclopedia Britannica, and other online encyclopedias.


    Foreign Languages

    If your children are learning foreign languages, then look into these tools as an aid to their studies.

    1. Alpheios Basic Libraries

      This tool is designed to give students access to tools to facilitate language learning. Use this with any of the specific language tools.

    2. Alpheios Greek Tools

      Learning ancient Greek just got easier with this tool.

    3. Alpheios Latin Tools

      Alpheios also provides tools for learning Latin.

    4. Greek spellchecking dictionary

      For students studying Greek, this tool will help them discover any spelling errors they may have made.

    5. Translate English to German

      This tool will help students learning German check their work.

    6. Translate German to English

      Students can see if they are progressing in their German with this tool.

    7. Translate English to French

      Use Google Translate to help find French words from English.

    8. Translate French to English

      Students can use this tool as a companion to the English to French version.

    9. Translate English to Italian

      If Italian is the target language for your student, then give this tool a try to boost her language learning.

    10. Translate Italian to English

      Again, this works as a companion tool to the English to Italian tool.

    11. FoxLingo Translator

      This tool helps with anything from language learning to web page translation and supports 71 languages.


  • Productivity

    Keep kids and parents on track with these productivity tools.

    1. list.it

      Use this tool to take notes on your computer.

    2. Google Shortcuts

      Get all your Google shortcuts displayed easily anywhere you like on your computer.

    3. Procrastato

      If you like to spend a little time doing fun stuff on the Internet, use this tool to remind you to get back to your schoolwork.

    4. Smartsheet Quick Add

      If you use a Smartsheet to-do list, then this add-on will make it easier to keep it updated.

    5. MyStickies

      Put virtual sticky notes anywhere and even organize them by tabs.

    6. ColorfulTabs

      This add-on makes all the tabs a different color, thereby making them more distinguishable when you have several open at once.

    7. TooManyTabs

      Another tab management tool, this one adds extra rows of tabs instead of keeping them tiny and all on one row.

    8. Google Calendar Quick Add

      Effortlessly add an item onto your Google calendar with this tool.

    9. Google Calendar Notifier

      Have an entire day’s worth of tasks displayed for students to stay on track of each day’s assignments.

    10. TabAlarm

      This tool schedules tabs to open at specific times throughout the day. Assign lessons on websites that occur when you want them to.

    11. TimeTracker

      This tool tracks how much time is spent on each website so you can track productive time, play time, or see how long a task is taking.


  • Research

    These add-ons are sure to boost online research for any project.

    1. Trailfire

      Leave notes on websites, then organize any way you want and even share them with others.

    2. Wordpot

      Use this tool to discover search terms based on a keyword you choose. This is a good way to boost Internet research.

    3. Zotero

      Collect, manage, and cite all the research sources you find online with this add-on.

    4. note-o-rama

      Students making notes on web pages and journal articles will find this tool helpful with both marking and citing references.

    5. Diigo

      Add highlights and sticky notes to websites to help with your Internet research.

    6. Yooper

      Quickly and easily highlight and share information with this tool. It even has a memory tester.

    7. TextMarker!

      Use up to three different highlighting colors to keep track of important information on websites.

    8. Notefish

      You can save, organize, and share information from the Internet with this add-on.

    9. Great Summary

      Summarize any website to quickly determine if it holds the information you need.

    10. QuickWiki

      Look up information from Wiktionary and Wikipedia quickly when this tool is installed.


  • Parental Controls and Computer Security

    Make sure your computer is safe for the entire family with these great tools.

    1. Fox Filter

      This add-on is a filter for parents to put in place to keep out unwanted and inappropriate websites.

    2. KidZui

      This tool makes Firefox searches safe for kids ages 3-12.

    3. Yahooligans

      Another kid-safe search engine, this one is appropriate for children and teens.

    4. Glubble for Families

      Turn your browser into one with games and websites safe for your family.

    5. brOOzi

      Parents set which websites are safe for their children with this add-on.

    6. Menu Editor

      Eliminate menu items your children don’t need to streamline their computer usage.

    7. Clean Screen

      This tool allows parents to set parameters that will clean up what is seen on webpages to correct spelling errors, eliminate foul language, and more.

    8. SkipScreen

      If you would prefer your children not be bombarded with unnecessary ads while surfing the net, then download this add-on.

    9. LastPass

      This password manager allows you to create strong passwords and manage them all with one master password. It even autofills passwords for you.

    10. iTrustPage

      Prevent children from accidentally filling out suspicious forms with this tool.

    11. Viral Threat Level

      This tool adds an image to the toolbar that indicates the level of threat at any given time from malware, viruses, and more.

    12. Certificate Patrol

      Stay on top of certificate updates to ensure your children’s websurfing is done among legitimately authorized sites.

    13. BetterPrivacy

      Non-deletable longterm cookies can compromise your family’s privacy, but not with this tool in use.

    14. Adblock Plus

      Stop pop-up ads, banners, and ad tracking malware with this tool.

    15. Flag-N-Trust

      This add-on puts a flag on each website visited to indicate the country in which it is being hosted. When you click on the flag, you can learn about the trustworthiness of the site.


  • Search Engines and Web Browsing

    Find specialized search engines and help for web browsing when you use these add-ons.

    1. SweetSearch

      When using this search engine, only trustworthy sites will appear in search results. This is great for student research projects.

    2. search games, homework research and more

      This tool provides a safe place for children to surf the net with hand-picked safe sites.

    3. GoodSearch

      Use this add-on and 50% of the revenue from your Internet searching goes to a charity of your choice.

    4. SchoolTube

      This add-on will provide results from SchoolTube to your searches.

    5. FastestFox

      Speed up your web browsing experience with this tool.

    6. DeeperWeb

      Enhance Google searches with this tool that uses a tag-cloud technique.

    7. termBlaster

      Now you can perform searches within over 110 websites just by right-clicking your mouse.

    8. Similar Sites Search Provider

      Use this tool to help you find sites similar to the one you are currently searching for.

    9. 100 Search Engines for Firefox

      Don’t rely on just one search engine when you can use this tool that pulls from all the major sites plus plenty of others.

    10. deliGoo

      Search through all the sites you have bookmarked through Delicious to refine your searches by the sites you choose.

    11. Web Search optimized for TeacherTube

      TeacherTube offers tons of great educational videos, and this tool will help you search it more efficiently.


  • Miscellaneous

    Take a look at this collection of add-ons that provide everything from research in art to discounted textbooks to a homeschooling resources toolbar.

    1. Eccellio Arts

      From photography to fine arts, this search engine will help you find exactly what you need from the world of art.

    2. Web of Knowledge

      Find and share information in the sciences, social studies, arts, and humanities.

    3. Evidence Scribe

      Use this add-on to help find and manage evidence used for debating.

    4. Addictive Typing Lessons

      Students can learn touch-typing with this add-on.

    5. Numpad Typing Drills

      Once typing skills are beginning to set, try these drills to motivate faster and more accurate typing.

    6. Textbook Search

      Find textbooks at big savings with this tool.

    7. OpenBerg Lector

      Read etexts or ebooks within Firefox with this tool.

    8. Compare Books Prices

      If you are seeking new or used books, use this tool to find the lowest price from major sites such as eBay and Amazon.

    9. Homeschooling Resources Toolbar

      This toolbar is a great addition for homeschooling families and includes lots of great links and tools.

    10. Tutit

      Keep all the tutorials you may be using in one place with this add-on.